PREVIEW ENVIRONMENTS FOR A DISTRIBUTED SYSTEM, BUILT ON AWS
Most projects I have worked on follow the same shape: three long-lived branches, each deployed to its own environment.
- development, where finished features land so they can be tested
- staging, where a release candidate is checked before it goes out
- production, where the real users are
It works well until the team grows past a handful of people. Then the development environment turns into a meeting room everybody has booked for the same hour. You want to show the product owner the new checkout flow, a colleague has just deployed a half-finished migration, and QA is in the middle of testing a third thing that neither of you has touched. Someone asks in the team chat “who is on dev right now?” and the honest answer is “everyone”.
Running the project locally does not really solve it. A local setup is good for writing code, not for proving that code works the way it will in the cloud, and it is no help at all when the person who needs to see the feature is not a developer.
On one of our partners’ platforms we solved this with preview environments: every feature branch can get a complete, isolated copy of the system in the cloud, with a link you can send to anyone. This post walks through how we built it on AWS, how it plugs into the CI/CD pipeline, and how every environment gets cleaned up again.
What a preview environment is
A preview environment (you will also see ephemeral environment or review app) is a temporary environment that exists to show one feature, in its own context, without getting in the way of anything else. It should be as close to production as you can reasonably make it, because the whole point is to trust what you see there. And it should disappear when the feature is done.
A few terms I will use throughout:
- Environment identifier: a short, unique name derived from the feature branch, such as
dev-1234. Every resource that belongs to an environment carries it. - Dependency: another part of the system an app needs in order to run. For the frontend that is the backend; for the backend it is the database and the cache.
- Shared environments: the long-lived development and staging servers that everyone uses.
Why distributed systems make it harder
For a monolith, this is a solved problem. Heroku’s Review Apps, or a per-pull-request deployment job in your CI of choice, clone one application, point it at a throwaway database and you are done. One app, one copy.
The system we were working on is not one app. It is an Angular frontend with server-side rendering, a Node.js backend, a PostgreSQL database and a Redis cache. A “complete” environment is not a copy of any one of them; it is a copy of all of them plus the wiring between them. The frontend has to know where its backend lives, the backend has to know where its database and cache live, and none of those addresses exist until the resources have been created.
It is tempting to cut corners and share the expensive parts. A single database for all preview environments sounds reasonable, right up until two features write conflicting data into the same tables. And that is the mild case. The moment one feature needs a schema change, its migration runs against the shared database and every other preview environment breaks along with it.
So the first real design decision was deciding which resources had to be private to each environment. For us the answer turned out to be: all of them. Anything stateful (the database, the cache) had to be private for correctness. The apps had to be private because they are the thing being previewed. The only parts we were happy to share were the ones that never change per feature: the container registry, the shared configuration and the pipeline itself.
What we wanted from it
Before writing any scripts I wrote down what “done” should look like:
- Fully automated. Nobody should have to open the AWS console to create, connect or delete anything.
- Natural to use. It should fit the way the team already works: branches, pull requests, CI. No new tools to learn.
- Easy to maintain. Plain, readable scripts rather than a platform that needs its own specialist.
- Close to production. Same container images, same kind of database, real data.
- Cheap enough to leave running for the few days a feature is in review.
- Portable. If we ever moved cloud provider, the apps themselves should not care.
We chose AWS. Partly because of the breadth of managed services, which meant we did not have to run a database or a cache ourselves, and partly because everything in AWS can be done from the CLI or an SDK, which is exactly what “fully automated” needs. Cost was the other deciding factor: small instances, spot capacity and managed services billed by the hour fitted the “cheap enough” requirement.
The architecture
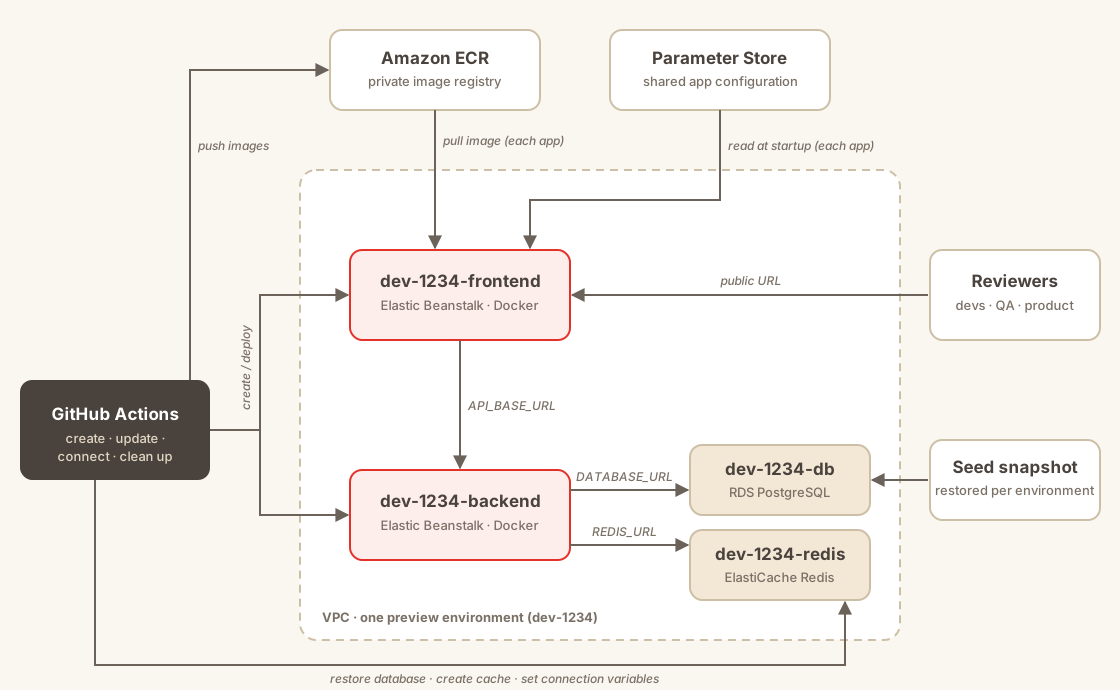
Each piece has one job:
- Elastic Beanstalk runs the frontend and backend containers. It hides most of the infrastructure (EC2 instances, security groups, health checks, logs) behind a single “environment”, gives you a dashboard to see and restart things, and lets you set environment variables per environment. That last part matters more than it sounds; it is how the pieces get wired together.
- Elastic Container Registry (ECR) stores the Docker images privately, one repository per app, one tag per environment.
- Amazon RDS hosts one PostgreSQL instance per environment, each restored from a prepared snapshot.
- ElastiCache hosts one Redis cache per environment, starting empty.
- AWS Systems Manager Parameter Store holds the configuration every preview environment starts from, with secrets stored encrypted.
- GitHub Actions drives all of it.
Everything hangs off the environment identifier. A backend branch called DEV-1234-invoice-export produces the identifier dev-1234, and from it:
dev-1234-frontend: the frontend environmentdev-1234-backend: the backend environmentdev-1234-db: its PostgreSQL databasedev-1234-redis: its cache
The frontend and backend live in different repositories, so the identifier is also what ties them together. If both branches start with DEV-1234, they belong to the same environment.
Extracting it is one line of shell. It is deliberately forgiving about case, and it also accepts identifiers that are not ticket numbers (DEV-hotfix-login becomes dev-hotfix) for the times you need an environment without a ticket:
ENV_ID=$(echo "$GITHUB_REF_NAME" | tr '[:upper:]' '[:lower:]' | grep -o 'dev-[0-9a-z]*' | head -n 1)
Building an environment, step by step
For each app, creating an environment comes down to three steps: build the image, push it to the registry, and ask Elastic Beanstalk to run it. The backend then needs a database and a cache, and the frontend needs to find its backend. I will go through each.
The snippets are trimmed to the essential steps; logging and error handling are left out.
1. Building the Docker image
Why Docker at all? Elastic Beanstalk can build a Node.js app directly on the instance. Our first attempt did exactly that, and the backend build on a small instance ran past Beanstalk’s time limit for preparing an application. Shipping a prebuilt image fixed that, and it brought the things you want anyway: the same artefact everywhere, isolation, and no lock-in to Beanstalk’s own build process.
The Dockerfile went through several iterations, from “it runs” to something that builds quickly and produces a small image. Three lessons came out of that.
Order the instructions for the cache. Docker caches every step, and reuses the cached result as long as that step’s inputs have not changed. Dependencies change rarely; source code changes on every commit. So the version that looks perfectly reasonable:
COPY . /app
RUN npm ci && npm run build
throws the cache away on every single build, because the input to npm ci is now the whole project. Splitting it lets the expensive install step be reused until package.json or the lockfile actually changes:
COPY package.json package-lock.json /app/
RUN npm ci

COPY . /app
RUN npm run build
In a pipeline that runs many times a day, this is the difference between a build that reinstalls the internet every time and one that mostly does not.
Clean up in the same step. Every RUN produces a layer, and a file created in one layer still takes up space in the image even if a later step deletes it. If a step creates something it will throw away, such as a download cache or build tooling, remove it in the same RUN, chained with &&. This matters most in a single-stage image; with the multi-stage build below, only what you copy into the final stage ships at all.
Ship only what runs. The build stage needs compilers, dev dependencies and source files. The running container needs none of them. A multi-stage build copies across only what the app needs at runtime:
FROM node:24-alpine AS build
WORKDIR /app
COPY package.json package-lock.json ./
RUN npm ci
COPY . .
RUN npm run build && npm prune --omit=dev

FROM node:24-alpine
WORKDIR /app
COPY --from=build /app/dist ./dist
COPY --from=build /app/node_modules ./node_modules
COPY --from=build /app/entrypoint.sh ./
EXPOSE 3000
ENTRYPOINT ["sh", "./entrypoint.sh"]
What goes into the final stage varies from project to project; for the frontend it also included the static assets. A smaller image uploads faster, downloads faster when Beanstalk starts the container, and costs less to store.
One more detail: the Beanstalk instances are amd64 (x86) Linux machines, while most of our laptops are Apple Silicon (ARM). The platform has to be explicit, or an image built on a laptop builds fine and then refuses to start in the cloud:
docker build --platform=linux/amd64 -t "$ENV_ID-backend" .
Cross-building like this through emulation is slow, especially for the frontend. In CI it does not matter because the runners are amd64 already, which is one more reason the images are only ever built by the pipeline.
2. Configuration
Both apps need a long list of environment variables. The obvious home for them is Beanstalk’s own environment configuration, but Beanstalk caps the combined size of an environment’s variables at 4,096 bytes, and the backend’s list did not fit.
Instead, the shared configuration lives in AWS Systems Manager Parameter Store, one parameter per variable under a path per app (/preview/backend/, /preview/frontend/), with secrets stored as encrypted SecureString values. Each app loads its path at startup with the AWS SDK, using the IAM role of the instance it runs on. Only the handful of values that differ per environment (database address, cache address, the URL of the other app) are set on the Beanstalk environment itself, comfortably inside the limit, and they take precedence over the shared ones.
This also keeps the images free of secrets. An image contains code and nothing else, so it is the same harmless artefact wherever it runs, and changing a setting for every preview environment is a single edit in Parameter Store instead of a rebuild.
3. Pushing to the registry
The image is tagged with the environment’s name, so each environment has exactly one image in the registry:
docker tag "$ENV_ID-backend" "$REGISTRY/backend:$ENV_ID-backend"
docker push "$REGISTRY/backend:$ENV_ID-backend"
On an update, the script deletes the old tag first and checks afterwards that the new one actually arrived before telling Beanstalk to use it. Failing early here is much easier to debug than a Beanstalk environment that quietly keeps running last week’s code.
4. Running it on Elastic Beanstalk
Beanstalk’s Docker platform is told which image to run through a small Dockerrun.aws.json file, which the script generates on the fly:
mkdir -p dockerrun && cd dockerrun
cat > Dockerrun.aws.json <<EOF
{
  "AWSEBDockerrunVersion": "1",
  "Image": { "Name": "$REGISTRY/backend:$ENV_ID-backend" },
  "Ports": [ { "ContainerPort": 3000 } ]
}
EOF
The port has to match the one the Dockerfile exposes. From there, the EB CLI does the rest. The script checks whether the environment already exists and either creates it or deploys a new version to it:
eb init "$EB_APPLICATION" --platform "Docker running on 64bit Amazon Linux 2023" --region "$AWS_REGION"

STATUS=$(aws elasticbeanstalk describe-environments \
  --environment-names "$ENV_ID-backend" --no-include-deleted \
  --query 'Environments[0].Status' --output text)

if [ "$STATUS" = "None" ]; then
  eb create "$ENV_ID-backend" --single --enable-spot --instance-types t3.micro,t3a.micro
else
  eb deploy "$ENV_ID-backend"
fi
--single skips the load balancer, which a preview environment does not need. --enable-spot runs it on spare EC2 capacity at a fraction of the on-demand price. If a spot instance is reclaimed, Beanstalk replaces it; for an environment that only lives for a few days, that trade is easy. Small instances also meant tuning Node’s memory: both apps start with a capped heap (--max-old-space-size) so they fit comfortably in the instance instead of being killed under load.
With this, we could create any number of frontend and backend environments. The interesting part is giving them their own dependencies and connecting everything.
5. A database per environment
This was the hardest part of the whole project. A fresh, empty PostgreSQL instance is easy to create and useless. The app needs a realistic amount of data to be worth looking at, and the environment needs to be ready quickly, because a preview nobody can open for an hour does not get used.
Restoring a database dump into a fresh instance with pg_restore takes about an hour, far too long to wait for every environment. So we did that slow restore once, saved the result as an RDS snapshot holding a representative dataset, and create every preview database from the snapshot instead:
aws rds restore-db-instance-from-db-snapshot \
  --db-instance-identifier "$ENV_ID-db" \
  --db-snapshot-identifier "$SEED_SNAPSHOT" \
  --db-instance-class db.t4g.micro \
  --db-subnet-group-name "$DB_SUBNET_GROUP" \
  --vpc-security-group-ids "$DB_SECURITY_GROUP"
A fully populated database is available in roughly ten minutes, and the call returns immediately, so it runs in parallel with everything else. The price is that the snapshot has to be refreshed from time to time so it does not drift too far from the current schema. In practice that was rare: the backend applies the branch’s own migrations at startup, on top of whatever the snapshot contains, so the snapshot only has to be close to the current schema, not identical.
6. A cache per environment
The cache is the easy one. It needs to be private, so environments do not read each other’s cached data, but it does not need to contain anything at the start:
aws elasticache create-cache-cluster \
  --cache-cluster-id "$ENV_ID-redis" \
  --engine redis \
  --cache-node-type cache.t4g.micro \
  --num-cache-nodes 1 \
  --cache-subnet-group-name "$CACHE_SUBNET_GROUP" \
  --security-group-ids "$CACHE_SECURITY_GROUP"
7. Wiring the backend to its dependencies
Now there is a chicken-and-egg problem. Beanstalk creates the backend environment in a few minutes; the database takes about ten. A backend that starts before its database exists will crash in a loop.
The trick was to let the backend container start parked. Its entrypoint does nothing until the pipeline says the dependencies are ready:
#!/bin/sh
if [ -z "$START_APP" ]; then
  echo "Waiting for the pipeline to connect the database and the cache..."
  exec tail -f /dev/null
fi

[ -n "$START_WORKER" ] && node dist/worker.js &
exec node dist/main.js
Meanwhile, the pipeline waits for the database and the cache, reads their addresses, and sets them on the backend environment in one go, together with the flag that lets the app start:
aws rds wait db-instance-available --db-instance-identifier "$ENV_ID-db"
aws elasticache wait cache-cluster-available --cache-cluster-id "$ENV_ID-redis"

DB_HOST=$(aws rds describe-db-instances --db-instance-identifier "$ENV_ID-db" \
  --query 'DBInstances[0].Endpoint.Address' --output text)
CACHE_HOST=$(aws elasticache describe-cache-clusters --cache-cluster-id "$ENV_ID-redis" \
  --show-cache-node-info --query 'CacheClusters[0].CacheNodes[0].Endpoint.Address' --output text)

ENV_NS=aws:elasticbeanstalk:application:environment
aws elasticbeanstalk update-environment --environment-name "$ENV_ID-backend" \
  --option-settings \
    Namespace=$ENV_NS,OptionName=DATABASE_URL,Value="postgres://$DB_HOST:5432/app" \
    Namespace=$ENV_NS,OptionName=REDIS_URL,Value="redis://$CACHE_HOST:6379" \
    Namespace=$ENV_NS,OptionName=START_APP,Value=true
The database credentials are left out of the snippet. Changing environment variables makes Beanstalk restart the container, and this time the app starts for real. Once the environment reports healthy, a last step calls a couple of the backend’s own endpoints to clear its content caches.
The background worker, which processes queues and scheduled jobs, gets the same treatment with START_WORKER. Some of its jobs need to know the frontend’s address, for example to put links in emails, so it only starts once a frontend has been connected. A backend-only environment runs without it.
8. Connecting the frontend
The frontend is designed so that it does not need its own backend. Its shared configuration points at the development API by default. That means a frontend-only change can get a preview environment in one step, without paying for a backend, database and cache it does not use.
When there is a matching backend, the frontend’s connect step waits for both environments to be ready and then points them at each other: API_BASE_URL on the frontend, FRONTEND_URL (and START_WORKER) on the backend. If the backend is still being created, the step keeps retrying for a while, about ten minutes, before giving up and asking you to run it again later. That gave us a rule of thumb we told everyone: when you need both, start the backend first.
Plugging it into CI/CD
Everything above is plain bash. That is deliberate: the scripts do not know or care which CI system runs them, so moving to another CI provider would mean changing a few lines of workflow, not the scripts. And because they run in the pipeline, nobody needs AWS credentials or a working Docker setup on their own machine, and no laptop spends half an hour cross-building images.
On demand, not on every pull request
Most preview-environment tools create one automatically for every pull request. We deliberately did not. Here a full environment means two instances, a database restored from a snapshot and a cache. It costs money for every hour it exists and takes ten to twenty-five minutes to come up. And many of our tasks simply did not need one: a copy change, a refactoring covered by tests, a dependency update, a backend fix QA could verify against the shared API. Creating a complete environment for each of those would have spent most of the budget on environments nobody opened, and slowed down every pull request while doing it.
So creating a preview environment is a decision, not a side effect. Whoever works on the task starts one when the task actually needs it, and only for the parts that changed: the frontend, the backend, or both.
The workflows
In GitHub Actions, each repository has four small workflows, all started manually from the Actions tab by picking the feature branch:
- Preview Environment: Create builds the environment and connects it to its dependencies.
- Preview Environment: Update rebuilds and redeploys the app after you push new commits.
- Preview Environment: Connect To Backend (frontend) and Connect To Dependencies (backend) re-run only the wiring step, for example when the backend was created after the frontend.
- Preview Environments: Cleanup deletes everything belonging to an environment.
All four call the same reusable workflow, passing in the steps they want:
name: 'Preview Environment: Create'
on: workflow_dispatch

jobs:
  create:
    permissions:
      id-token: write
      contents: read
    uses: ./.github/workflows/preview-environment-util.yml
    with:
      EXECUTE_STEPS: 'create-or-update|connect'
The reusable workflow sets up AWS access once and runs whichever steps were asked for:
name: 'Utils: Preview Environments'
on:
  workflow_call:
    inputs:
      EXECUTE_STEPS:
        type: string
        required: true

jobs:
  preview-environment:
    runs-on: ubuntu-latest
    permissions:
      id-token: write
      contents: read
    env:
      AWS_REGION: $
      REGISTRY: $
    steps:
      - uses: actions/checkout@v5

      - name: Install the Elastic Beanstalk CLI
        run: pipx install awsebcli

      - uses: aws-actions/configure-aws-credentials@v5
        with:
          role-to-assume: $
          aws-region: $

      - uses: aws-actions/amazon-ecr-login@v2

      - if: contains(inputs.EXECUTE_STEPS, 'create-or-update')
        run: ./preview-environment/create-or-update.sh

      - if: contains(inputs.EXECUTE_STEPS, 'connect')
        run: ./preview-environment/connect.sh

      - if: contains(inputs.EXECUTE_STEPS, 'cleanup')
        run: ./preview-environment/delete.sh
Why one workflow with a list of steps instead of separate reusable pieces? The steps do not depend on each other so much as on the state the environment is in, but every one of them needs the same AWS setup and the same variables. Splitting them would have meant repeating that setup in several files and keeping the copies in sync. With a single workflow, the environment is defined once and you choose what to run.
The workflow authenticates through GitHub’s OpenID Connect integration: it assumes an IAM role scoped to exactly what preview environments need, so there is no long-lived AWS key stored in the repository to leak or rotate.
On the frontend, the Create and Connect To Backend workflows take two inputs: a backend environment identifier and a default backend (development or staging). The identifier field is forgiving on purpose. It accepts dev-1234, DEV-1234, or the full backend branch name, and extracts the identifier from whatever you give it. Leave it empty and the frontend connects to the shared server you picked instead.
That gives four ways to use it:
- Frontend-only change: create just the frontend; it talks to the shared development API.
- Backend-only change: create just the backend and test it through its own URL.
- Full-stack change: create the backend, then the frontend with the same identifier.
- Changed your mind: created the frontend first and later realised you need your own backend? Create the backend with the same identifier, then run Connect To Backend on the frontend.
Cleaning up
Creating environments on demand keeps their number down, but every one of them still has to go away again. A forgotten environment costs exactly as much as one in use, so deleting them cannot depend on someone remembering.
Automatically, on merge. Besides being available as a manual workflow, the cleanup runs on every push to the develop branch. When a feature is merged, the merge commit message contains the feature branch’s name. The script extracts the environment identifier from it and removes everything carrying that identifier. Each repository cleans up its own half: the frontend removes its environment, the backend removes its environment together with the database and the cache.
# Backend cleanup: data stores first, then the image, then the environment
aws rds delete-db-instance --db-instance-identifier "$ENV_ID-db" \
  --skip-final-snapshot --delete-automated-backups
aws elasticache delete-cache-cluster --cache-cluster-id "$ENV_ID-redis"

aws ecr batch-delete-image --repository-name backend \
  --image-ids imageTag="$ENV_ID-backend"

aws elasticbeanstalk terminate-environment --environment-name "$ENV_ID-backend"
aws elasticbeanstalk delete-application-version --application-name "$EB_APPLICATION" \
  --version-label "$VERSION_LABEL" --delete-source-bundle
The database is deleted without a final snapshot; it was a copy of the seed snapshot to begin with, plus whatever testers typed into it. Deleting the application version as well matters more than it looks. Beanstalk keeps every version you have ever deployed, and with a new environment per feature those pile up quickly until you hit the account’s version limit.
Defensive by design. Because the script runs in the develop pipeline, it must never break it. If it cannot find an identifier (a direct commit to develop, for example), or the environment does not exist or is already terminating, it says so in the log and exits successfully.
Manually, when needed. Branches get abandoned rather than merged, and sometimes a feature is verified long before it is merged. For those cases, running the Cleanup workflow on the branch removes the environment straight away. Two rules from our internal docs apply here. Make sure you run it on the right branch, because the identifier decides what gets deleted. And never cancel a create or delete half-way: a half-built or half-deleted environment has to be tidied up by hand in the console.
What it gave us, and what it costs
The benefits showed up quickly:
- No more queueing for development. Features are tested side by side without stepping on each other.
- Feature-by-feature delivery. A feature is reviewed in isolation before it is merged, so a release is no longer held back because one unfinished feature happened to land on the shared branch next to five finished ones.
- A link you can send. Product owners, designers and QA see the real thing in a browser, not a screen recording.
- Fewer surprises after merge. Problems that never appear on a laptop (configuration, container behaviour, real data) show up in the preview instead of on development or, worse, in production.
- Cleaner history. Fewer “fix” and “revert” commits on the shared branches, because things were already verified before they got there.
It is not free:
- Cost. A full environment is two small instances, a small database and a small cache. Spot instances and automatic cleanup keep it reasonable, but it is real money, and it scales with how many environments are open at once.
- Time. Ten to twenty-five minutes from click to working link, dominated by the database restore and the frontend build. Fine for a review, too slow for a quick check.
- Complexity. It is another system with its own failure modes, and when a step fails, someone has to understand Beanstalk, RDS and the scripts to fix it.
- Maintenance. The seed snapshot has to be refreshed, base images and platform versions need updating, and the shared configuration has to keep up with the apps.
Back to the meeting room
The development environment still exists, and it is still busy, but it is no longer a meeting room everyone has booked for the same hour. It went back to being what it was meant to be: the place where finished, reviewed features come together. The arguing over who gets to deploy next happens a lot less, and when someone asks “can I see it?”, the answer is a link.
If your team keeps asking “who is on dev right now?”, that question is usually the cheapest sign that it is time to look at preview environments. For a distributed system it takes more wiring than the one-click solutions for monoliths, but none of the pieces are exotic. It is a naming convention, a few managed services, and a pipeline that knows how to connect them.

Claudiu Zalinca
I strive for clean code, for it is the path to the light side of programming.
Using Redis with Node.js

Continuous Integration & Delivery
